
Tired of puddles forming every time it rains? Want to make your yard more eco-friendly? Installing permeable pavers might be your answer. These special pavers let rain soak through instead of running off, helping to prevent floods and reduce pollution.
In this guide, you’ll learn how to install permeable pavers step by step. Whether you’re fixing your driveway or building a new patio, it’s easier than you think. We’ll walk you through the tools you need, how to lay the pavers, and how to keep them working well all year long.
What Are Permeable Pavers and Why Choose Them?
When you hear the term permeable pavers, it refers to special paving stones that let water pass through them. Unlike regular concrete or asphalt, these pavers allow rainwater to soak into the ground instead of running off the surface.
This makes them an excellent choice for eco-friendly drainage solutions; especially in areas focused on sustainability. For homeowners considering paver installation San Diego, permeable pavers offer both functionality and environmental benefits perfectly suited to the local climate.
Understanding Permeable Pavers
Permeable pavers are designed with gaps or holes, or they are made from materials that water can easily pass through. This helps prevent puddles and flooding after heavy rain. Instead of water collecting on top or flowing into storm drains, it slowly filters through the pavers and into the soil beneath. This process is better for the environment because it reduces pollution and helps refill underground water sources, also known as groundwater.
Why Choose Permeable Pavers?
Choosing permeable pavers is a smart move if you want to manage rainwater naturally and avoid problems like flooding or erosion. They help protect nearby streams, lakes, and rivers from harmful chemicals that usually wash away with stormwater. For homeowners, permeable pavers are also great because they reduce water pooling around your driveway or walkways, making your outdoor space safer and cleaner.
Benefits Beyond Drainage
Besides helping with water, permeable pavers come in many styles and colors, so they look great too. They can be used in patios, driveways, and sidewalks without sacrificing style. Plus, since they reduce water buildup, they can lower the chance of cracks caused by freezing and thawing cycles during winter.
Tools and Materials You’ll Need to Install Permeable Pavers

Before you start installing permeable pavers, it’s important to have the right tools and materials on hand. This will make the job smoother and help you get great results without frustration. Knowing what you need upfront saves time and effort.
Essential Tools for the Job
To install permeable pavers, you’ll need some basic tools. A shovel and a rake are important for digging out the area and leveling the ground. A tamper or plate compactor helps press down the base material so it’s firm and stable. You’ll also want a level to make sure your pavers are even and flat. Don’t forget safety gear like gloves and goggles to protect your hands and eyes during the work.
Materials You’ll Use
The main material is, of course, the permeable pavers themselves. These come in different shapes and sizes, but all allow water to flow through or between them. You’ll also need crushed stone or gravel for the base layer under the pavers.
This base lets water drain away easily. A layer of coarse sand goes on top of the base to create a smooth surface for laying the pavers. Finally, edging materials help keep your pavers in place and prevent shifting over time.
Where to Get Supplies
Most of these tools and materials are available at your local hardware store or home improvement center. You can also find permeable pavers through specialty suppliers who focus on eco-friendly products. Buying quality materials is worth it because they last longer and work better.
Step-by-Step Guide to Installing Permeable Pavers
Installing permeable pavers may seem tricky, but with the right steps, you can do it yourself. This guide will walk you through the process in simple, easy-to-follow steps so your outdoor space can drain water naturally and look great.
Step 1: Prepare the Area
Start by marking the area where you want to install the pavers. Remove any grass, plants, or topsoil to create a clean space. It’s important to dig deep enough—usually about 8 to 12 inches—to make room for the base layers. This preparation gives you a solid foundation and helps water soak through properly.
Step 2: Build the Base
Next, spread a layer of crushed stone or gravel evenly across the area. This layer acts like a sponge, letting water pass through while supporting the pavers above. Use a tamper or plate compactor to press the gravel down firmly. A compact base keeps your pavers stable and prevents shifting over time.
Step 3: Add a Sand Layer
After compacting the gravel, add a thin layer of coarse sand on top. This layer helps level the surface and makes it easier to place the pavers. Use a rake or board to smooth the sand out evenly, but don’t compact it too much—you want it to stay loose enough for the pavers to settle in.
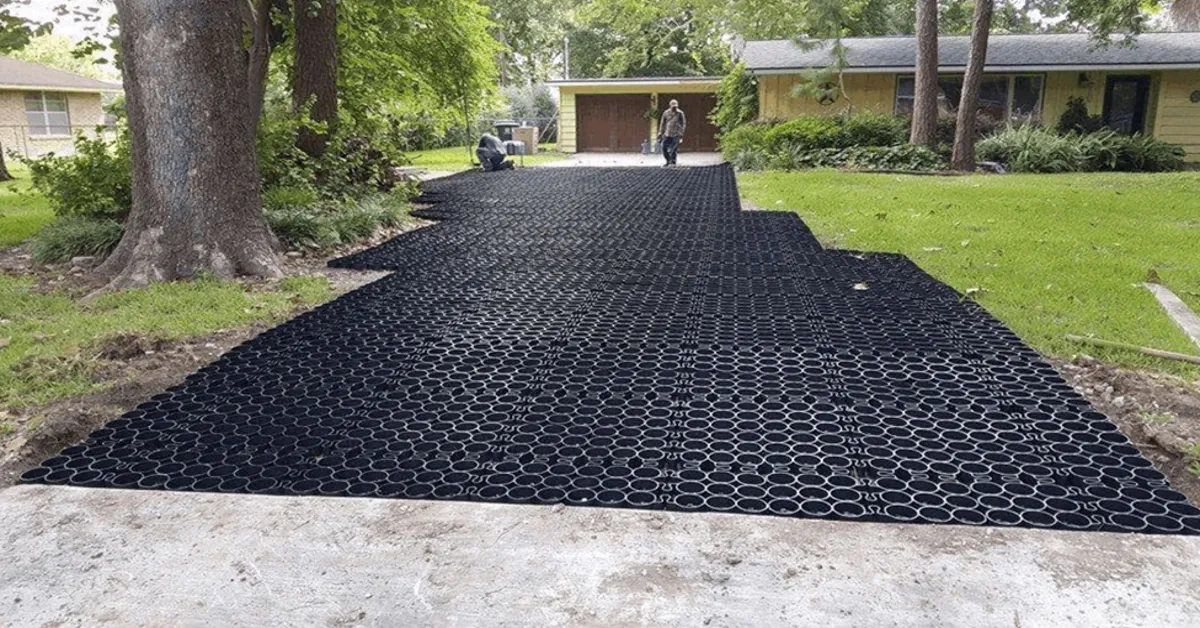
Step 4: Lay the Pavers
Now it’s time to place the permeable pavers. Start at one corner and work your way across the space. Make sure to leave small gaps between the pavers if they don’t have built-in spaces for water flow. These gaps will later be filled with gravel or sand. Use a level as you go to keep everything even.
Step 5: Finish Up
Once all the pavers are in place, fill the gaps with small gravel or sand to allow water to pass through easily. Then, compact the entire surface lightly to set the pavers firmly. Finally, give the area a gentle watering to help everything settle.
Caring for Your Permeable Paver System
Installing permeable pavers is a great way to manage water and protect your outdoor space. But to keep them working well, a little care and maintenance are needed. Taking simple steps will help your pavers last longer and keep draining water properly.
Keep It Clean
The most important thing is to keep the surface free of leaves, dirt, and debris. When debris builds up, it can block the spaces between the pavers and stop water from soaking through. Regularly sweeping or using a leaf blower to clear the area helps prevent clogs and keeps your drainage system working smoothly.
Prevent Clogging
Try to avoid letting heavy dirt or mud wash over your pavers, as this can fill in the gaps and reduce permeability. You can also add gravel borders around your paved area to catch extra runoff and keep soil from washing onto the pavers. This small step helps maintain water flow and stops problems before they start.
Fix Small Problems Quickly
Sometimes pavers can settle unevenly or shift out of place. If you notice this, lift the affected pavers, add or adjust the base material underneath, then set them back down. Filling any gaps with fresh gravel or sand will help maintain a level surface and keep water flowing where it should.
Seasonal Care Tips
In winter, avoid using salt or harsh chemicals on your permeable pavers because these can damage the surface and harm the environment. Instead, use sand or kitty litter for traction on icy spots. After heavy snow or rain, check your pavers for debris or movement and clean or adjust them as needed.
Conclusion
Permeable pavers are a smart, green way to manage water and upgrade your outdoor space. Easy to install and good for the earth, they help keep your yard dry and clean. Try them out; you’ll love how simple and eco-friendly your landscape can be with the right steps.